Sheet 0
PABE Exercise Sheet 0
NOTE:
- This sheet is not part of the mandatory sheets that are required for the admission for the final exam!
- Contrary to the other sheets, you will not hand in solutions to tasks 1-5 on this sheet. Instead, you are advised to solve them on your own or in a group, and we will talk about the tasks in the first exercise session on 2021-10-22.
- All tasks should be solved under Linux (Fedora, Arch Linux, Ubuntu, Kali, <your_favorite_distro_here>). Use a virtual machine if you do not have access to a native linux machine.
Task 0 - The journey to PABE land
Welcome, new PABE student!
This very first task sends you on an adventure full of tiny annoying obstacles and corny language. On your journey, you will hopefully gather everything you need to successfully participate in the PABE lecture and exercises. At the end, there is even a treasure1 waiting for you!
If at any point you get stuck or discover an ambiguity, please send us a message to seclab@posteo.net!
Til Bardaga2!
Troublesome Travels
Your first task is to reach the land of milk and honey, which is carrying the slightly strange name of pabe.seclab-bonn.de.
But alas! A diligent group of guards called the “GSG”3 is blocking your way!
You need to find a way to sneak around them.
Luckily, you are given a map by a friendly sorceress which shows the location of your destination, as well as three ways to get past the guards:
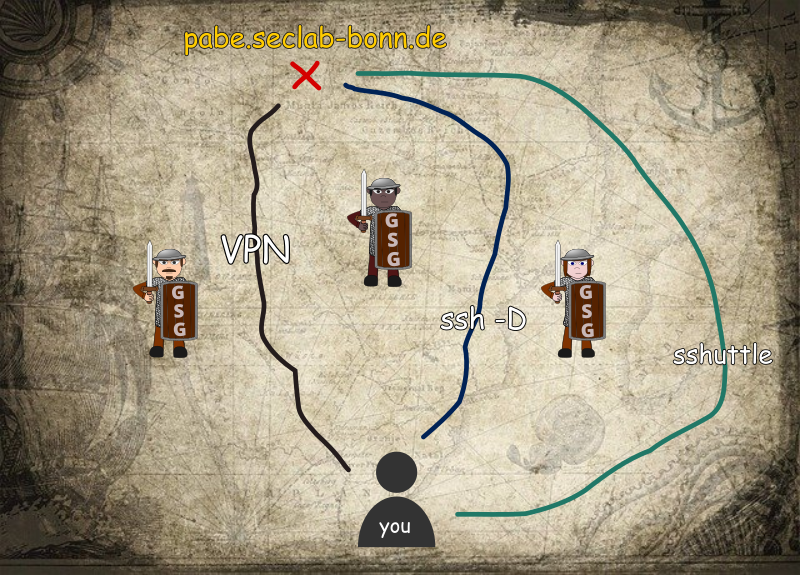
Option 1: Very Perilous Nighttime (VPN) activities
You have acquired plans from the GSG that explain how to set up a Virtual Private Network to use a tunnel right through their defenses.
It requires multiple steps to set up, but once you succeed, no further configuration is required to access pabe.seclab-bonn.de with your browser or git command line.
Option 2: ssh -D
A sysadmin (some kind of wizard) who is probably older than time itself has been rambling about combining a secure shell with a mushroom4 to sneak past the guards. Luckily, the instructions are less rambly and quite detailed:
- Connect to login-stud.cs.uni-bonn.de using the -D flag by executing:
|
|
- Configure your web browser to use a SOCKSv5 proxy with
localhostas your SOCKS Host and port 1337 - (If port 1337 is already in use on your system, use a different one)
- Visit
pabe.seclab-bonn.dein your browser. Success!
You can use a browser plugin like FoxyProxy to tell your browser to automatically use this proxy for certain urls. *.seclab-bonn.de, for example.
You probably want to also configure ssh to use login-stud as a jump host when accessing pabe.seclab-bonn.de.
Add the following configuration inside the file .ssh/config on your system (create it if it does not exist yet):
|
|
Most people prefer to generate a ssh key pair and copy their public key to login-stud.cs.uni-bonn.de with the script ssh-copy-id.
This avoids a lot of password typing.
Option 3: The stammering shuttle
As Miley Cyrus taught us: You can have the best of both worlds. Maybe. There is an express route serviced by the the sshuttle:
|
|
This makes all the traffic from your machine evade the defenses as well, and you can travel to pabe.seclab-bonn.de safely.
Visiting the first lecture
Luckily, you do not have to complete the previous steps to participate in the first lecture. Visit https://bbb.informatik.uni-bonn.de/b/mar-wsr-mds on 2021-10-15. The BBB room will be open starting from 11:45 CET, and the actual lecture will start at 12:15 CET.
Bonding
As part of this lecture, you will be told to register for the exercises.
Since it is dangerous to go alone, you have to form groups of up to 3 people.
Right after the first lecture on 2021-10-15, there will be an online “speedfriending” event for people who do not already have a group. During this event, you will get to know other people who attend the lecture and who also do not have a group. It is the perfect occasion to form groups on the fly!
Do not worry if that does not work out for you or you cannot attend: You can still register on your own, and will then be merged into a group by us.
Warning: Do not register before the first lecture on 2021-10-15! Your data may get wiped, and you will not be able to get bonus points for this task because you are not able to follow simple instructions.
The registration takes place at https://pabe.seclab-bonn.de/registration. Since you have come this far, you have already learned how to access that site. Neat!
Use your university email address to register.
The local-part (e.g. the part before the @) will become your user name.
For example, if you register with s6alturi@uni-boon.de, your user name will be s6alturi.
- If you do not already have people that you would like to form a group with, simply register on your own while leaving the
group tokenfield empty. You will be merged into groups after the registration has concluded. - If you do have one or two people that you would like to form a group with, have one person register while leaving the
group tokenempty. That person will receive a group token. Then have the other people fill in that exactgroup tokenwhile registering themselves.
Your first quest! Capture the flag.
After the groups have been formed and initialised in the GitLab, it is time to work on your first task!
It probably makes sense to tell GitLab your public ssh key, in order to again avoid a lot of password typing. GitLab should offer you to add one – if not, you can find the option in your GitLab user preferences under “SSH Keys”.
In GitLab, you should see a project that belongs to you, which is called exercise_0.
Check it out! (as in: run git clone so you get a local copy).
It mainly contains a file called README.md in which you find this text. Hello there!
Now for what you actually have to do:
Create a Python3 script that reads contents of a file at /opt/flag and prints it to stdout.
The script file has to be called solution (yep, it must not have a file extension),
must contain a shebang as the first line (#! /usr/bin/env python3)
and must have been made executable (chmod +x solution).
If you did everything right, you should be able to execute the script by running ./solution in a shell, and get the contents of /opt/flag – provided you created that file on the machine you are running the script and wrote something into it.
Virtual Worlds
Computers are tricky, especially if you want to exploit their innermost workings. Therefore, you can use a Virtual Machine (VM) to run your solution in an environment that is similar to the one that your solution will be graded in.
There will be a dedicated VM for each group. You can connect to your VM via ssh. The user name is once again the local-part of the email address you used to register. The port number is your group number plus 11000. So if you are in group number 42, your port number is 11042.
This means the final ssh command line call would look something like this:
|
|
You can simplify the call and avoid having to set up a VPN connection or using sshuttle for this to work by configuring specifics and a jump host in your local ~/.ssh/config file:
|
|
This shortens your ssh call to ssh pabe-vm.
Once again, most people prefer to copy their public ssh key to the VM with ssh-copy-id in order to avoid a lot of password typing.
Once you have access to your VM, you can copy your local solution to the VM and test it by e.g. executing the following commands:
|
|
Do you like what you see? Great! Seems like it is working. Time to submit your solution to get those juicy bonus points.
Submit
Create a commit that adds your solution script and push it to GitLab.
Some people prefer to use the command line to do that (git add ., git commit -m"Add solution", git push);
some prefer to use graphical tools like Git Cola.
Checking in with the oracle
Sometimes, getting to run code reliably is tricky. Well, most of the time, actually.
We have set up a Continuous Integration task on GitLab that will show you what happens if one attempts to execute your solution in our infrastructure.
Every time you push to your repository, a magical robot will carry your code away, run it, and bring back the output that it produced.
You can check the output by clicking the green checkmark icon that appears on your commit on GitLab once the check has concluded, and make sure it looks like you intended.
If instead you spot a red cross on your commit on GitLab, that means something probably went horribly wrong. Clicking the red cross should tell you what the issue was. Fix it, commit and push again, and hope that you get a green checkmark (and the output you desire) this time!
And if you are certain that something went wrong and it is absolutely not your fault, please complain via email to seclab@posteo.net.
…and profit!
If you did everything right, you will get two juicy bonus points!
After grading, you can have a look at the branch called tutor-notes to see how many points you received and which encouraging comments your tutor left for you.
If you don’t like what you see, you can even complain!
Arts and sciences, research and teaching shall be free, after all.
So that is the end of your bodacious journey. You have now learned all the basics you need to successfully work on future tasks and gain points towards admission to the exam.
Task 1 - Python Programming With pwntools
Write a Python 3 script and use pwntools (link).
Connect to pabe.seclab-bonn.de on port 11337 with remote (link) and do the following:
- read the first string that always ends with an
@character (link) - read the second string that always ends with a
%character - concatenate those two strings without the special characters
@and%and send them back to the server - the server will send a string back to tell you that everything was correct -> check that string!
Task 2 - Intel x86 Assembler
Have a look at the following snippet of assembler code:
|
|
What are the final contents of eax, ebx, ecx, and edx? You can do this mentally (i.e. use your brain) or use a tool like Jasmin (link) or even Unicorn Engine if you want to get really fancy (link)
Task 3 - Understanding a C Program
Look at the following source code:
|
|
Answer the following questions:
- What does the program do? Go through all the lines and try to understand (really understand) what it does.
- Where in memory (memory segment) does
bufferreside? - Where in memory (memory segment) do
user_inputand*user_inputreside? - What values does
buffercontain after the initialization? - What’s the difference between
strcpyandstrncpy? Isstrncpysecure for all parameters? - What’s the difference between
user_input,&user_input, and*user_input? - Look at the following assembler code:
To which line(s) in the above source code might this snippet correspond? What is happening there?
1 2 3 4 5 6 7 8 9... sub esp, 0xc push 0x400 call 8048430 <REDACTED@plt> add esp, 0x10 mov DWORD PTR [ebp-0x410], eax cmp DWORD PTR [ebp-0x410], 0x0 jne 804862d <main+0x82> ...
Task 4 - Compilation of a C Program
Have a look at the following code in a file called main.c:
|
|
Answer the following questions:
- What is the output of
gcc -E -P main.c? What can you see? Where is themain()function and what are the other lines? - Run
gcc -S -masm=intel main.cand have a look at the newly created filemain.s? Can you make sense of those lines? Is there a semantic connection between the C source code above? Can you find matching lines? - Run
gcc -c main.cand also runfile main.ofor the newly created filemain.o. What does the output tell you? - Run
strings main.o, can you find anything related to the C source code? - Run
xxd main.o, what do you see? What do the different columns mean? Why are there sometimes.(dots) in the rightmost column? - Run
nm main.o, what do you see and more concrete what doesUmean?
Have a look at the following code of a file called lib_hello.c:
|
|
and this code called use_lib.c:
|
|
Answer the following questions:
- Compile the code with
gcc -shared -fPIC lib_hello.c -o libhello.soand runfile libhello.so. What is the output and how is it different to the output offile main.o? - Run
gcc -L$(pwd) -o use_lib use_lib.c -lhelloand describe what the command does. What is the result? (if you want to run the final binary executeLD_LIBRARY_PATH=$(pwd) ./use_lib) - In the previous
gcccommand… what happens if you leave the-L$(pwd)flag and why? (maybeld -lhello --verbosewill help you)
Task 5 - Bug Hunting
Download the following (not so well written) source code and try to win the game!
The goal is to make the program print out the flag (#define FLAG "FLAG{REDACTED}").
Connect to pabe.seclab-bonn.de on port 11338 and get the flag!
Hint: Maybe your name has an impact on the fortune…